
Do you use Trello to help streamline any aspect of your online business? My personal favorite board inside my Trello account is used to organize my editorial calendar.
My Editorial Calendar Trello Board is where I collect all of my content ideas, link my drafted blog posts, track which blog posts are scheduled, and monitor which posts have already been promoted. The Editorial Calendar Trello Board is the hub where all my content can be easily accessed at a moment’s notice.
Using a Trello board is ideal for dropping all your content ideas in one place, knowing what content is in the works, and what content is scheduled to go live.
Prior to using Trello to track my content status, there often were times where I would have dozens of Google Docs open and I didn’t actually know when these posts were due or how I could fit all the pieces together.
As my main objective in my business is to work smarter, not harder; Trello has become an important asset to my content management system.
Not only does Trello help to put everything I’m working on in front of me, it also helps me to see if any of my content ideas tie together to create something bigger or greater for my audience.
If you’re not familiar with Trello, it’s a free tool that allows you to organize and prioritize your tasks.
Here’s an inside look at my Editorial Calendar Trello Board.
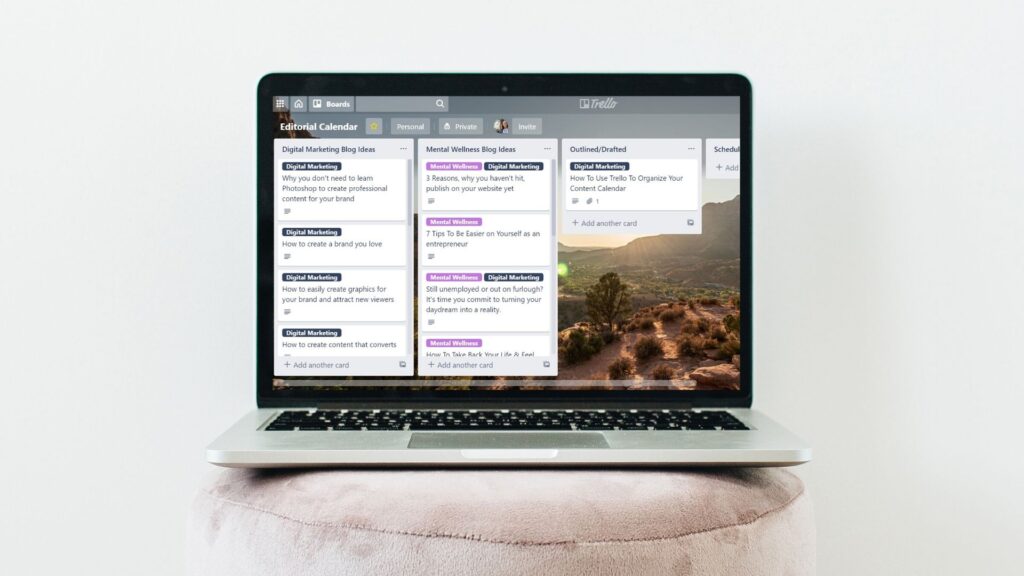
The only thing not pictured in this screenshot is the “Promoted” list which contains all the blog posts I’ve already written and published to the blog.
The exact process I use to track my content creation schedule in Trello:
The exact process I use to track my content creation schedule looks a little something like this. I start by brain-dumping a list of content ideas into my Trello board’s idea list and I write a brief description in each card to flesh out my idea a little more. The brief description provides a reference point for when I look back to expand on this idea in the future.
Then I look to see which content category my idea falls under in my blog and I add the appropriate label to its Trello card. If the Trello card is not already in the proper list, I transfer it to the correct list which correlates to the card’s label name.
After my new content ideas are organized appropriately within Trello, I get off the computer and turn to my physical content calendar. (What can I say, I’m a sucker for good old pen and paper.)
Here’s when I start to transfer my ideas onto an actual calendar.
When I’m planning out my content for the upcoming months I try to alternate between my two main blog categories (these categories correspond to the labels on my Trello cards) every week.
If you’re not familiar with how to choose your blog categories or core content topics, I recommend you check out this blog on how to create your content calendar.
While I try to post relevant content that builds off each other week after week, I’m also making sure that the content is able to be a standalone piece of content. This helps allow new blog readers to jump into my blog content at any point.
An important note when creating and scheduling your blog content:
Your blog posts should link back to your other posts if the reader wants to dive in further, but it shouldn’t require previously published content to be read in order to comprehend your new content.
With this information in mind, I organize the ideas on my Trello board into an appropriate timeline on my content calendar. Once my timeline is established, I start writing the actual blog content in order of when it will be published to my website.
Organization is the ultimate time-saver for working smarter, not harder:
To easily stay organized, I link my working Google Doc to the Trello card of its specific blog post. I also move the Trello card from the idea list to the Outline/Drafts list. This list is where all working blog posts stay in my Trello board until the written content has been finalized and all graphics accompanying the blog post are created.
Once all aspects of the blog post have been completed, it’s time to upload and schedule the content on WordPress. This is when the Trello card moves from the Outline/Drafts list to the Scheduled list.
Finally, once the blog post is live on my website and I’ve pinned my Pinterest-optimized blog images to Pinterest, I can move my Trello card from the Scheduled list to the Promoted list.
And that’s a wrap!! You now know the entire cycle of each Trello card’s journey from idea conception to a published, promoted piece of content.
Will you be using Trello to help organize your content now? Tell me in the comments below!
Looking for more content and brand strategy tips?
Every Wednesday morning, I break down one smart, strategic idea to help you show up online with more clarity, more confidence, and a brand your best-fit clients can’t stop thinking about.
Each email offers a practical reframe, built on strategy, buyer behavior, and what actually works online right now.
→ Subscribe to The Content Pour-Over to make sure when your brand is showing, it’s saying exactly what you want it to.